
How to Create a Damage Report
Users within a specific role have the ability to create damage reports within the system.
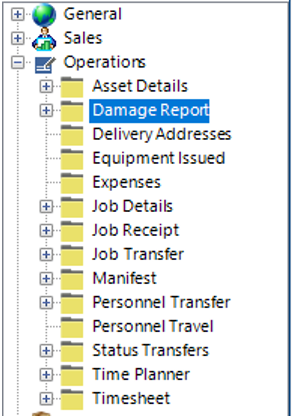
Locate the Damage Report Dataset
- Select Operations, then Damage Report:
Alternatively, you can create a damage report directly from a job:

Create a Damage Report
- From the screen in Step 1, select New Record>Damage Report or hit Insert on your keyboard.
- Fill in the relevant fields.
Note: (Pink = System Generated, Blue = Mandatory):
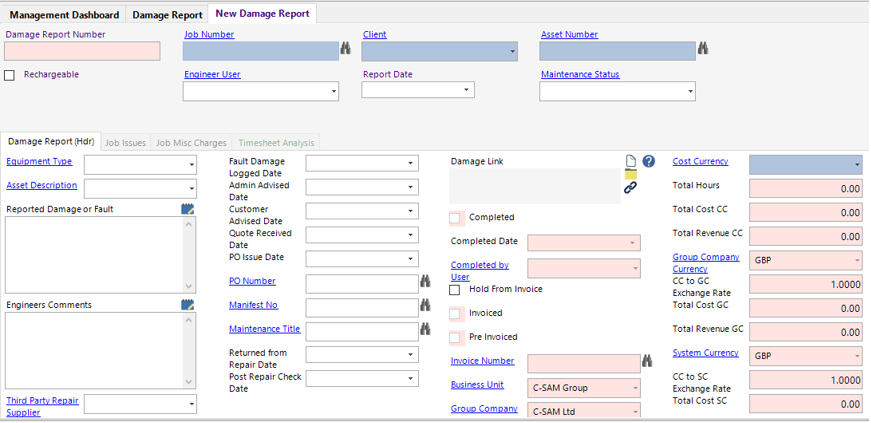
| Field | Description |
|---|---|
| Job Number | Manually enter the job number into field or select the binoculars to search the system |
| Client | This will automatically populate when the job number has been entered |
| Asset Number | Manually enter the asset number or select the binoculars to search the system |
| Rechargeable (Tickbox) | Check this if there are any costs which can be recharged to the client, this will pull through the Damage Report costs to the invoice when created |
| Engineer User | Select the relevant employee |
| Report Date | Select the relevant report date from the calendar |
| Maintenance Status | Select the relevant status |
| Damage Report (Hdr) | |
| Equipment Type | This will automatically populate when the asset number has been entered |
| Asset Description | This will automatically populate when the asset number has been entered |
| Reported Damage or Fault | Text field to record the damage or fault findings |
| Engineers Comments | Text field to record the engineer’s findings |
| Third Party Repair Supplier | Select the relevant third party supplier (if applicable) |
| Despatch Note No | Enter the despatch note no (if applicable) |
| Fault Damage Logged Date | Select the date from the calendar |
| Admin Advised Date | Select the date from the calendar |
| Customer Advised Date | Select the date from the calendar (if applicable) |
| Quote Received Date | Select the date from the calendar (if applicable) |
| PO Issue Date | Select the date from the calendar (if applicable) |
| PO Number | Manually enter the PO number or use the binoculars to search the system (if applicable) |
| Manifest No | Manually enter the manifest number or use the binoculars to search the system (if applicable) |
| Maintenance Title | Manually Enter the PO number or use the binoculars to search the system (if applicable) |
| Returned from Repair Date | Select the date from the calendar (if applicable) |
| Post Repair Check Date | Select the date from the calendar (if applicable) |
| Damage Link | The user can link a file/folder/webpage to the damage report |
| Hold from Invoice (Tickbox) | Check this box if you wish to hold from invoice |
| Business Unit | Select the relevant business unit |
| Group Company | Select the relevant group company |
| Cost Currency | Select the relevant currency |
Click Save.
- If the item required spares, select New Record>Job Issues.
Fill in the relevant fields.
Note: (Pink = System Generated, Blue = Mandatory):
| Field | Description |
|---|---|
| Category | Select the relevant category type, will automatically populate if Our Part No is entered first |
| Equipment Type | Select the relevant equipment type, will automatically populate if Our Part No is entered first |
| Our Part No | Manually type in the part no used or use the binoculars to search the system |
| Qty Required | Enter the value |
| Job Issues (Hdr) | |
| Issues to User | Select the relevant employee (if applicable) |
| Revenue Rate BC | Enter the value in currency format |
| Group Company | This will default from the previous screen |
| Office | Select the relevant office |
| Stock Location | Select the relevant stock location |
| Notes | Text field to record additional information |
| Chargeable (Tickbox) | Check this box if the job issue is chargeable to the client |
| Hold from Invoice (Tickbox) | Check this box if you wish to hold this record from the invoice |
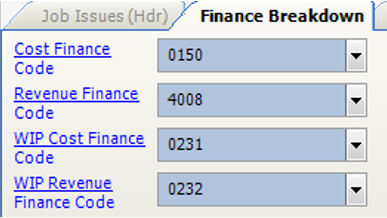
- Select the Finance Breakdown tab and view/edit/assign the correct codes:
- Select the Bin Issue tab:

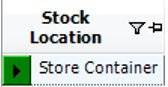
- Within the grid view, enter the required value in the Qty Allocated field, select Refresh, the colour code will change from Red to Yellow if the required qty is available:

- Select Functions>Complete Issue.
Select Refresh, the colour code will now change from yellow to green:
Select Close to return to the main Damage Report screen
- If the damage report requires additional charges other than spares/consumable etc. select New Record>Job Misc Charges.
Fill in the relevant fields.
Note: (Pink = System Generated, Blue = Mandatory):
| Field | Description |
|---|---|
| Job Number | This will default from the previous screen |
| Sort Order | If you wish the misc charges to show in order, enter the item number |
| Charge Type | Select the relevant charge type |
| Job Misc Charges (Hdr) | |
| Description | Text field to record the description of the misc charge |
| Qty | Enter a value into this field |
| Billing Currency | Select the relevant currency |
| Projected Revenue Rate BC | Enter a currency value into this field (if applicable) |
| Actual Revenue Rate BC | Enter a currency value into this field (if applicable) |
| Start Date Time | Select the date from the calendar |
| End Date Time | Select the date from the calendar |
| Notes | Text field to record additional information |
| Damage Report | This will automatically populate to the damage report number you’re adding into the system |
| Hold from Invoice (Tickbox) | Check this if you wish to hold the record from the invoice |
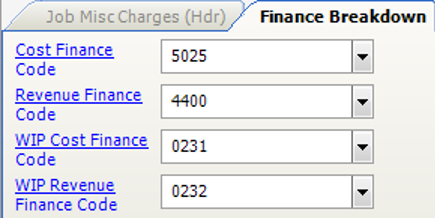
- Select the Finance Breakdown tab and view/edit/assign the correct codes:
Select Close to return to the main Damage Report screen.
- To print the damage report, select Print>Damage Report.
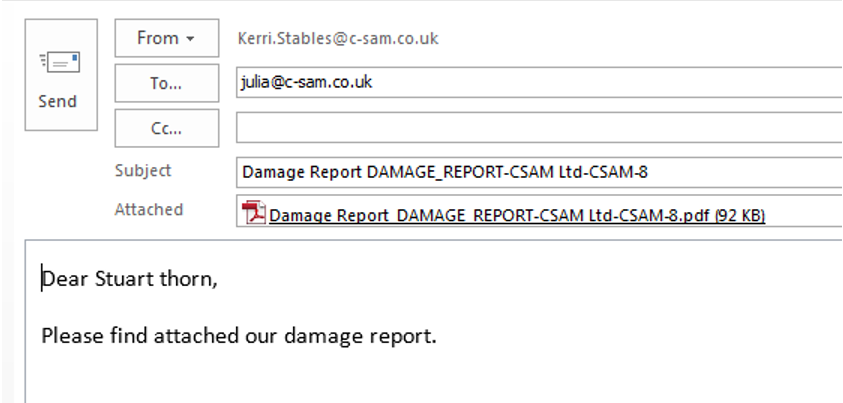
- To email the damage report, select Functions>Email Damage Report.
Select Yes to use Outlook, a new email will automatically be populated with the contact details and attach the damage report:
- Select Functions>Complete Report:
Select Yes to continue, or No to cancel the operation.